
How to Install a Bard HVAC Thermostat?
Since its founding in 1914, Bard Manufacturing has been a commercial heating and cooling specialist, earning a reputation for integrity, high-caliber goods, and outstanding customer support. Throughout their century-long existence in the industry, they have consistently improved, developed, and adapted to the shifting needs of their customers.


The Bard HVAC business got off to a groundbreaking start in the 1930s with its first oil furnace and has continued with its indoor air quality solutions to this day. Bard Manufacturing Company is a family-run enterprise. The Bard family firm is successful in its fourth generation, and the fifth generation is significantly involved in the management and day-to-day business.
Bard Manufacturing prioritizes research and development to enhance climate control systems. The company's product line offers heating and cooling solutions for a range of customers in the academic, telecom, mining, indoor agriculture, light commercial, and other sectors. For the creation of premium HVAC products for its quickly expanding global market, Bard uses innovative equipment on its modern production lines.
Every single product is thoroughly examined and put under individual testing at the Bard HVAC production plant to ensure its quality. If you're searching for the correct online store to purchase Bard replacement parts and accessories, PartsHnC is suitable for you. Over time, we have continuously provided delivery services for Bard HVAC components.
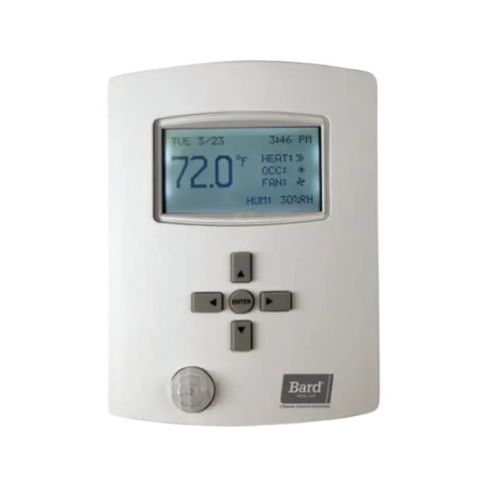
Bard HVAC Thermostat:
Bard-manufactured thermostats are ideal for durability and work accuracy. The thermostat is an important part of HVAC systems. It is helpful for controlling temperature by turning on or off heating or cooling units or controlling the flow of a heat transfer fluid as necessary.
For smart energy management, Bard provides BRIGHTSTAT™, COMPLETE STAT™, T4 pro programmable thermostat, T6 pro series programmable thermostat, T6 pro-WI-FI series programmable thermostat, and AC & HP programmable thermostat types in thermostat category.
How to replace the Bard HVAC thermostat of your home?
Step 1: Thermostat must be positioned on an interior wall. It must be far from any heating systems, sunlight, windows, air ducts, air distribution obstructions, and any other causes of the unpredictable or incorrect temperature reading. The correct position of the thermostat provides you with the correct functionality.
Step 2: Purchase a replacement Bard HVAC thermostat that is compatible with your system. Examine the compatibility between your old thermostat and the replacement thermostat shown on its packing. Most replacement thermostats work with all popular systems.
If your system is unique, it could be difficult to get replacement Thermostat Parts and Accessories. Afterward, go to the PartsHnC website. Thermostats from all different manufacturers are available on our platform. These are your fundamental choices.
- Provide a high-performing Bard thermostat with one-stage cooling or heating systems.
- Selling OEM Bard thermostats. Bard manufactures Energy star certified thermostats.
- We have "Zoned HVAC" which refers to a system that allows for individual control of the heating and cooling in various locations.
Step 3: For wiring instructions for your replacement thermostat, read the Bard handbook. It's helpful to read all the installation instructions and go over all the accompanying photographs.
You want every aspect of yours to match yours. Taking images of the existing wiring before you begin is another friendly suggestion.
Step 4: At the breaker box, shut off the switches for your thermostat, furnace, and air conditioner. (Don't forget to switch off the power. Since cutting off the thermostat's electricity lowers the risk of electrical injury while you remove the old thermostat and replace it.)
Step 5: The outdated thermostat needs to be taken down from the wall. Most thermostats attach to the wall and move up from there.
Remove screws that are anchoring the wall plate to the wall.
Some thermostats have characteristics like a base and a sub-base. The exposed cables and an empty wall should be all that is left after the entire thermostat has been removed.
If the wires are sufficiently long and the exposed portions are oxidized, re-stripe them. If not, scrape the ends with a utility knife until they are shiny.
Step 6: Although most thermostat circuits are tagged, mistakes can happen occasionally. To ensure you're doing it correctly, take the following actions:
- Write a letter on each wire with a piece of tape that corresponds to the letter of the connector on the thermostat base. Write "B" on the piece of tape and attach it to the blue wire if it was in connection B. Any loose or disconnected wires from your thermostat should also be marked.
- Except for your own identifying needs, disregard wire color. Since amateur thermostat wiring frequently deviates from codes, the colors might not be exactly as they should be.
Step 7: To prevent the wires from falling back into the wall, tie them together or tape them to the surface. Losing a wire will make this very simple task into a total mess.
(Tip: Consolidate all the wires into a pencil. Just enough of the pencil's weight prevents the wires from moving.)
Step 8: To show the locations of the holes you must drill for the screws, use the new wall plate as a template. Drill the holes, and then screw the replacement wall plate into the wall in its new location.
- Your new thermostat must be completely level in order to provide reliable readings if it contains a mercury tube. In this situation, using a level is crucial and serves more than simply aesthetic purposes.
- Make sure the holes you drill correspond to the size of your screws. The usual drill bit size is 3/16".
- Undoubtedly, your thermostat includes screws and perhaps anchors as well. Use the anchors as well. The back of the wall-mounted system.
Step 9: To reconnect the wires to the thermostat, use your notes or labels, or refer to the photos you took of the original wiring.
- Either screw the wires onto the thermostat connectors or refer to the manufacturer's instructions booklet.
- Unless otherwise specified in the directions, the back of your replacement thermostat should have the same matching code. Get in touch with a heating and cooling firm if you have any doubts.
- Some thermostats just require a two-wire setup to function. Some have 5. Don't worry if your ports or connections are empty. Your thermostat is probably working properly.
Step 10: Put the thermostat up against a wall. If any cables have additional length exposed, reinstall them entirely into the wall. Set the thermostat just above the wall plate, and flush against the wall. It slid down until it rests in the grooves on the wall plate. You'll need to hire a technician to transfer the wires if your thermostat isn't in a suitable spot.
Step 11: Install batteries. Most devices need 2 AA batteries to operate. Verify the polarities, placement, and age of the batteries. Also, confirm that they are in place.
Step 12: Turn on the breaker box switches to restore power. Allow it a minute to get going.
Step 13: Make sure your thermostat sets the correct temperature settings. Give your furnace and air conditioner at least five minutes to start up. Retrace your actions to determine where you erred if the thermostat isn't functioning properly.
Your new thermostat's reset button might need to be pressed. Some won't start until you press this button.
To learn more about your particular type of thermostat, read the instruction booklet. If you have queries related to buying thermostat parts and accessories or other HVAC replacement components, then contact us at (866) 963-0907 or [email protected].


